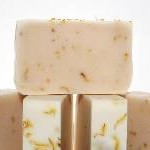
 If you are shopping around for a new hobby, why not try making your own soap? There are several methods of soap-making to choose from, and you can have fun creating your own unique soaps by experimenting with colors, fragrances, and more. In this article I have highlighted to methods for making soap- the “melt and pour” method and the “cold process” method.
Melt and Pour Method
You can make lovely glycerin soap bars by using the melt and pour method. This method is very basic and a great choice for the beginner or someone who has a shorter amount of time to devote to soap-making.
Before you start, be sure to gather all of the equipment and ingredients that you will need and prepare your work area so that you have plenty of space to make your soap. For this process, you will need a double boiler, a thermometer, a spray bottle filled with rubbing alcohol, soap molds, 1 lb. of glycerin, natural colorants, and essential oils. If you choose to use any other additives, have those ready as well.
Place the glycerin into your double boiler and allow it to melt. You want to heat it to approximately 155 degrees Fahrenheit. Once you’ve achieved that temperature, remove the pot from the heat source. Add your natural colorants to the glycerin and stir it well. If you see any air bubbles forming, you can spray the rubbing alcohol to get rid of them. After the colorant has been well blended, add the desired amount of essential oils to fragrance the glycerin–keep stirring and spray the air bubbles as needed. Once all air bubbles are removed, you can pour the mixture into your molds. Allow the soap molds to sit undisturbed for about an hour, and then place them in the freezer for approximately half an hour. After you take the molds out of the freezer, let them sit for an additional 5 minutes at room temperature before removing the soap from the mold. That’s all there is to it!
Cold Process Method
The cold process method of making soap is a bit more challenging. This shouldn’t discourage you if you are new to soap-making–this method just requires a little more time and patience. Your efforts will be greatly rewarded when you see the end result.
For this method, you will need a container and lid for the lye (one that can handle temperatures up to 200 degrees Fahrenheit), a large pot, 2 thermometers, whisk, stick blender, a food scale, measuring utensils, protective gloves and goggles, a soap mold lined with plastic wrap, solid oils (according to recipe), liquid oils (according to recipe), natural colorants, essential oils, and any other additives of your choosing.
Before you begin, choose a recipe that you are going to follow and study it well. A large, covered workspace is ideal for this project. Gather your equipment and ingredients and have everything measured so it’s ready when you need it. It is essential that you wear long-sleeves, protective gloves, and goggles. The lye used in the cold process method should not come into contact with the skin.
Measure all of your additives including colorants and essential oils into separate containers and place them in a pre-heated oven to keep them warm. The oven should be set at the lowest possible temperature so that you can handle the items with your bare hands when you need them. Measure the amount of lye and distilled water you need according to your recipe. Put the water in a container that can handle high temperatures, and then add the lye to the water. It is very important to add the lye to the water and not the other way around! Mix the solution well until all of the lye has dissolved into the water.
Next measure out your solid oils (your recipe will tell you which oils and how much you need) and put them into the pot. You will want to heat the oils slowly on your stovetop. Set the temperature to a medium-low setting. When the solid oils have melted completely, remove the pot from heat and add in your liquid oils (according to the recipe) and mix well. The objective now is to have the lye mixture and the oil mixture both achieve a temperature of approximately 95 degrees Fahrenheit. Use your thermometers to gauge the temperatures, and use hot or cold water baths to help the solutions either heat or cool them if necessary. Once the temperatures of both solutions are equal, very slowly pour the lye mixture into the oil mixture. You will need to be stirring as you pour. You can alternate using the whisk and the stick blender until you’ve reached “trace.” This means that the two solutions don’t have any chance of separating from each other. Making sure that the mixtures are blended together thoroughly is very important. Next add your colorants (they will be warm from the oven). Keep stirring and then add essential oils and any other additives you would like to use.
Once all of your ingredients are added and trace has been established, you can pour the soap into your prepared mold. The mold will now need to sit for a full 24 hours. Depending on the temperatures in the area you live, you may need to insulate your molds by covering them with parchment paper and wrapping them in blankets. After 24 hours, you can remove the soap from the molds and cut into bars. Once cut, place the bars on a tray that has been lined with paper toweling, and allow the soap to cure in a dark, cool area for 4 to 6 weeks. Rotate the soaps each week so that all sides of the bars are allowed air.


When you step into the market to pick up a bar of soap, what is it you’re really buying? Phrases like “beauty bar, deodorant bar, moisturizing bar,” and the list goes on and on, is only telling you one thing, you are not buying soap. What you are purchasing is a petroleum based detergent product.
Soap, by definition, is a cleansing agent made from the mixture of the sodium salts of various fatty acids or natural oils and fat. Because of FDA regulations, a cleaning product cannot be listed as soap unless it actually contains the fatty acids and natural oils combined with lye to produce soap.
So, what’s the difference you may ask? Let me tell you a story about my son. For two years he suffered with severe allergies, chronic sinus infections, and was all around miserable. The first step in dealing with his problems was to remove his adenoids that had become infected. After the surgery, his sinuses cleared up for all of two weeks. Then once again he succumbed to yet another sinus infection.
Unable to determine the reason for the sinus infections, he was put through allergy testing. After two sessions and more than 80 injections covering irritants from pet dander, mold, trees, dust (and the list goes on), they determined that he reacted to absolutely nothing. And so we were sent home with instructions to monitor his diet for the next month in the hopes of determining weather or not he suffered from a food allergy.
I had a better idea.
While allergy testing covers most airborne irritants, it does not cover the common chemicals we subject ourselves to everyday. Since my daughter and I are both severely allergic to formaldehyde, a common preservative used in most hand creams, lotions, lip balms, and cosmetics, it occurred to me that he might suffer from a similar allergy. So, I stripped his bedding, pillows, clothing, curtains, and washed everything in a batch of homemade olive oil laundry soap.
The result: After two weeks his sinuses began to clear. Within a month all of the symptoms he routinely suffered, from migraine headaches to breathing difficulties, gradually faded away as though they had never existed.
Many people today realize that our homes are over-saturated with a host of chemicals, many of which carry moderate to severe side effects with prolonged exposure. What we fail to realize is how many of them are completely unnecessary.
Making your own soap is both a rewarding and simple process and one that can truly benefit your entire family.